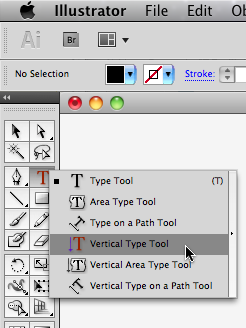
In my previous post I provided a solution for setting type vertically in InDesign. Illustrator in contrast to InDesign actually has a Vertical Type tool, and the close integration between the two applications means we can opt to set our type in Illustrator instead and bring it into InDesign as a graphic.
Vertical Type in Illustrator
Illustrator provides us with three different tools for setting vertical text. The Vertical Type Tool, Area Type Tool and Type on a Path Tool. For this exercise I’m using the first of the three available tools: The Vertical Type Tool.
With this tool, just click anywhere in your artboard area and start typing… and tadaa…. vertical type appears… How easy is that? (Let’s put this tool on our wishlist for future version of InDesign…)
To decrease or increase the spacing between the characters, change the Tracking value. You can do this at Character level (using the Character panel and tracking settings), or you can amend this setting as part of a Paragraph style you might be using.
Save the text (image) as a native Illustrator file.
Into InDesign
Time now to bring the vertical type into Illustrator. Although you can copy and paste from Illustrator into InDesign. I wouldn’t recommend doing this with vertical type, especially if you intend to edit the text at some point.
Copying and pasting Illustrator artwork into InDesign can be useful, for instance when you are interested in bringing logo-type shapes as editable paths into InDesign. One thing to consider is that the artwork would from that moment forward be edited in InDesign itself. In some circumstance that might be desired. However, when copy and pasting vertical text from Illustrator into InDesign, you’ll find that although the colour of the text and the size (of the placed artwork) is still be editable, the text itself can no longer be altered.
Instead Place the .ai file as a graphic using the File > Place command. To have control over the size of the image that is brought in, enable the Show Import Options.
To reduce the image area that is imported, set the Crop to Art. Assuming that the vertical type is the only artwork on the artboard in Illustrator, this crop sets the crop-size to the bounding box size that you’d see in Illustrator when you select the artwork. To place the text at the exact size that you’ve created it in Illustrator, simply click with the Loaded Graphics Icon on the page, then use InDesign’s Selection tools to position the text on the page.
Editing the text
To change the text itself in the future, the Illustrator file would need to be edited. With the text-graphic placed in InDesign, Option/Alt double-click the graphic. This will edit the original in Illustrator (the default application for placed .ai files). Make the changes in Illustrator, save the Illustrator file and return to InDesign and witness an immediate update.


Hello,
In Indesign CS5 I have only the options type (T),
and type on a path (shift+T),
I can’t see any option for typing vertical.
Thanks for your help.
bye,
Leonard
Hi Leonard,
That is correct, you can’t type ‘vertical’ in InDesign. You can in Adobe Illustrator. If you read this tip carefully, it will give you a work-around for getting text vertical in InDesign. It’s only a work-around. If you have lots of text to type vertical, I’d probably set it in Adobe Illustrator instead and place it into InDesign as a graphic (if you need to edit the vertical text, you’d edit the Illustrator file and update your Link in InDesign).
hope this helps,
— Cari