Digitip 017 – Adobe Photoshop CS
Updated 1-Feb-2010 (few typos fixed).
After seeing the new shadow/highlight Image adjustment command recently I got pretty excited. I’ve compared this new command against a more conventional selection and curves based technique used for (shadow) contrast and detail enhancement and found it to be much less distorting on 8-bit images.
The conventional curves method
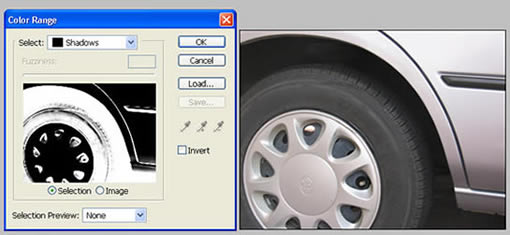
To ensure that only shadow ares of the image are colour corrected, the first step in this process is to isolate those shadow areas by creating a selection. I’m using the Select>Color Range command here.
Once the shadow areas are selected it is wise to soften the edges of the selection, so that major pixel adjustments blend in smoothly with uncorrected parts of the image.
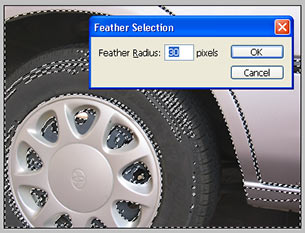
The Select>Feather command does just that…
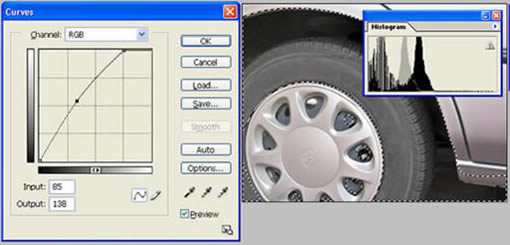
Next step is to “rip” the “heck” out of the curve in an effort to increase the brightness and contrast in the shadow areas of the image.
(thank you to Steve D. from the West for originally introducing me to this technique!)
The new Shadow/Highlight command
So how does the Shadow/Highlight command compare to this? Well, pretty amazing. When only looking at the shadows (as in the above example), it seems to cleverly isolate the shadow areas, without the need to create a selection first.

The command seems to shift the entire bundle of shadow pixels towards a lighter gamma range, resulting in a brighter shadow range. In addition to this, the “amount” value brings down the number of “dark” shadow pixels in the image.
So how do the two methods compare?
The comparison
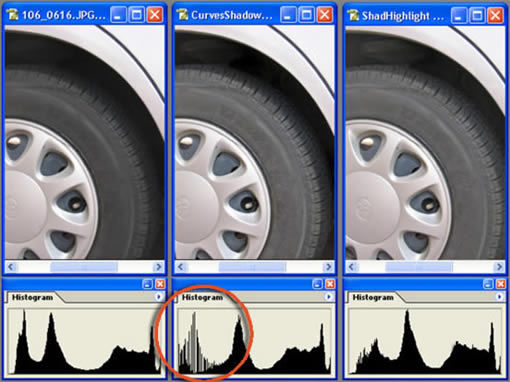
Overall my vote goes to the shadow/highlight. The shadow/highlight option might give slightly less contrast, but this is easily fixed by adjusting the tonal width value (more options… feature), using the same shadow/highlight command. The biggest difference is displayed when comparing the various histograms:
No clipping in the shadow areas using the Shadow/Highlight command.
No “spiking” and pixel distortion in the shadows, resulting in higher quality imaging (Shadow/Highlight Command)
And above all ANOTHER MAJOR TIME SAVER.
Conventionally speaking, highlights, midtones and shadows would require individual adjustments to be applied (i.e. selecting, feathering, curving, ok-ing x3)… The Shadow/Highlight command is a major GIFT provided to all of us who enhance dozens if not hundreds of images a day.
Thank You Adobe!
You write: “So how does the Shadow/Highlight commant compare to this? Well, pretty unique.”
It compares “pretty unique”? What does that mean?
(I had forgotten just how useful this PS feature is!)
-K. Pfeiffer