Fan of creative technology, elearning, instructional design and a little geeky

The importance of Save As

Digitip 055 – Adobe InDesign CS3

This tip really isn’t Adobe InDesign CS3 specific. But is extended to anyone working on complex InDesign documents for hours on end.

After a long day’s work

InDesign’s Info Panel displays document information including file size when no artwork is selected on pages. The following screenshot was taken after about 15 hours of work on a single InDesign file.

Info Palette with Document Size set to over 21 mb

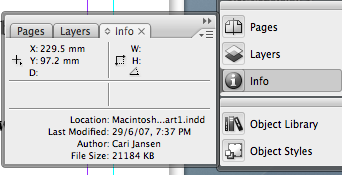
As you can see the document size is signficant, around 21Mb. Each time you perform the File > Save command your document grows a little bit. The added changes are gradually accumulated. Over a longer period of time, this can have a significant impact on the file size of the InDesign document.

After Save As

At the end of the day, before closing this document performing a File > Save As and overwriting the existing file significantly decreases the file size of the document.

Info Panel after Save As, reduced file size

Immediately following the Save As on the above InDesign CS2 file shrunk the filesize by 30% to around 14Mb.

So tip of the day: Don’t forget to perform a Save As every now and again. Your Info Panel will thank you for it.

Footnote: Have you ever noticed that the first time you ever save a document the dialog box says “Save As” and wondered why that is? Well think of it… Do you ever see a dialog box when saving your file? Nope, you don’t. So why develop a separate dialog box for “Save”, when really what you are doing the first time you save an Untitled document is performing “Save As”. You’re picking a save location and file name and possibly file format. Ok, there might not be another document to overwrite, but that is the only difference.

Similar posts
  • Adobe InDesign and XML: A Reference Guide The following is a reference guide I have compiled over time for those of you who are looking at doing a little more with XML in InDesign (originally published Feb. 2011, last updated Feb 2018). If you have any extra information you’d like to see added to this guide, feel free to message me. Mapping XML tags to InDesign [...]
  • How to change the colour of bullet points in InDesig... A few weeks ago I recorded a short quick tip tutorial. InDesign’s Control panel, gives users a quick and easy way to format text as a bulleted list. Highlight the text, and click the Bulleted List button in the Paragraph Formatting Controls mode for the Control panel. This applies a universal bullet character as the [...]
  • Creating a pop-up window in a PDF with Adobe InDesig... In the following YouTube tutorial, we’ll create an interactive PDF from Adobe InDesign, in which we click on a button, which in turn opens up a simple pop-up window containing a close-box. When the close-box is clicked the pop-up window disappears [...]
  • InDesign: Facing pages with odd-numbered left pages Back in 2004 I wrote a tip for InDesign CS on how you could have the first page of your document be a left page AND have it start with page number 1. It’s hard to believe this is almost a decade ago… But a recent question on Facebook, made me think I should really [...]
  • Negative Lookbehind – GREP for Designers This is the fourth and final blog-posts in a series of posts on lookaheads and lookbehinds in GREP, written after speaking at the Perth InDesign User Group. My speaker notes are also available: What is GREP? (PDF download) (2.4Mb). In the previous three posts I briefly introduced GREP, and we took a look at Positive [...]

No Comments Yet

Leave a Reply

Your email address will not be published. Required fields are marked *