Hyperlink to selected document pages
This is the 5th tip in a series of tips on Interactive PDFs. We’ve learnt in previous tips to create buttons, add cool roll over effects, add actions to buttons and more. In this tip we’ll look at using InDesign’s Hyperlink feature to create a link from the thumb tabs that appear on all pages of the PDF to particular pages in the PDF.
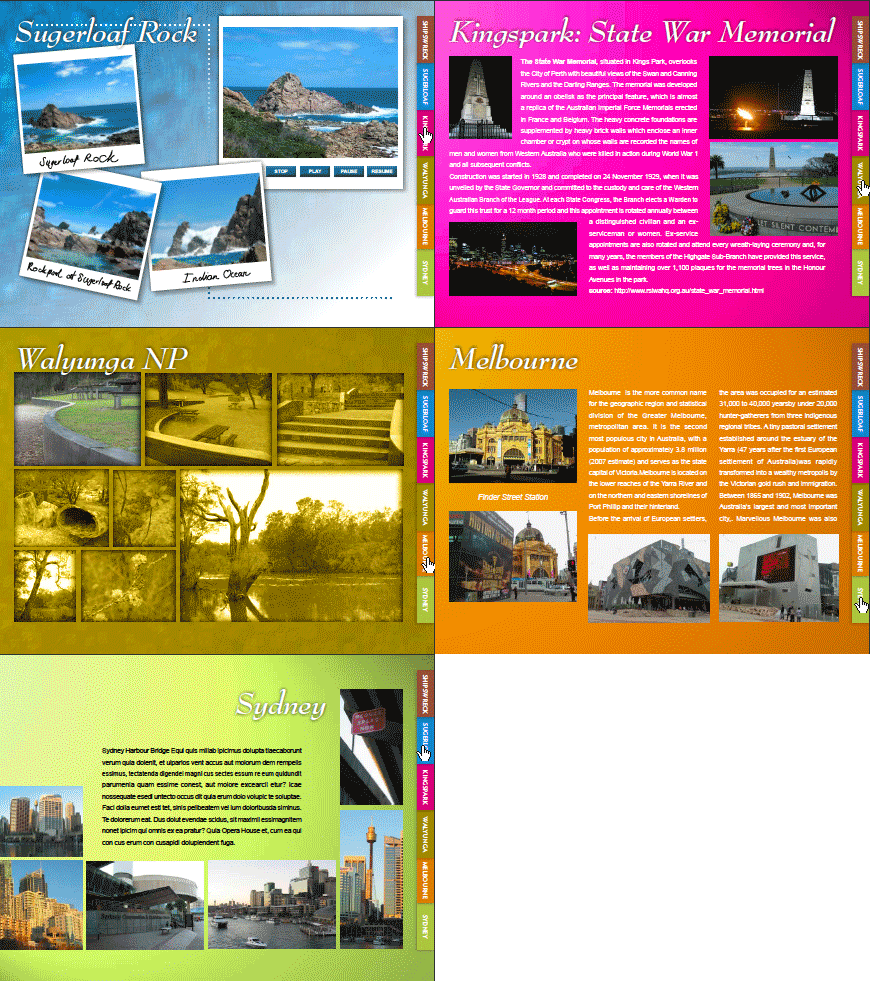
Master page and artwork
At the very start of this interactive PDF project, I opted to create a Master Page, that contained all of the side tabs on it that appear on all pages of the document.
First I renamed the A-Master default master page that appears in all new InDesign document. By choosing from the Pages Panel menu Master Options for “A-Master”…, and changing the master Prefix to “b” and the Name to “Base”.

Why Base? well, this master page is going to be the base for all other master used in this project.
On this master page, I’ve added the 6 thumb tabs that are going to be a navigational link to selective pages in the finished PDF file.

To ensure the Tabs always on top of any other content, I’ve place the the 6 text frames in a separate layer called “ThumbTabs”.

Basing master pages on other master pages
As the background tints and textures applied to document pages in the 6 different sections vary, I opted to create additional master pages that would be applied to each section’s document pages.
In order to include the thumb tabs on these additional master pages, each New Master page I created is based on the “b-Base” master and thereby inherits all of the objects (the thumb tabs in this case) that exist on this master.
Choose New Master from the Pages panel menu and enter the Prefix and Name for this this master.
Next set Based on Master to ‘b-Base’ and click OK to add the master to the pages panel.

Each of the background textures was placed into its own layer.

With all this master work completed, and master pages applied to document pages we’re now ready to get the thumb tab links working.

Thumb tab links
Before we build the hyperlinks, there’s a little homework to: dot down which document page is the first page of each of the different sections to which the thumb tabs will lead 🙂
In all honestly there are few different methods you can use when creating hyperlinks and link destinations in InDesign. The most commonly used method is to set the destination options as you are creating the New Hyperlink. However, I prefer to set my hyperlink destinations first and then point to these destinations later on when creating the hyperlink. Maybe a preference I picked up from earlier Acrobat work… not sure…
In this example I’m focussing on the orange Melbourne thumb tab. It is going to link to page 6 of the document.
Display the Hyperlinks panel (Window > Interactive > Hyperlinks)

From the panel menu, choose New Hyperlink Destination.
In the dialog that appears set Type to Page.
Name the Destination and set the Page number to ‘6’ (or other number in your case).

The Zoom Setting enables you to set display behaviour for the destination page in the PDF. I’m choosing “Fit in Window”, as I’d like for the person clicking the thumb tab to see the entire first page of the Melbourne section.
Next, display the b-Base master page.
On the master page select the thumb tab for which you want to create the hyperlink. In the example I choose the Melbourne thumb tab text frame.
Choose New Hyperlink from the Hyperlinks panel.
In the dialog that appears choose set Link To to “Shared Destination”. The destination we created earlier, can be used as many times for various different links if needed.
To complete the Destination setting, select the active Document, as this is the file in which we earlier created the destination and choose the Name of the destination. “Melbourne” in the sample here. [note: I’ve noticed that the Page reference below this isn’t always correct, not quite sure why, but believe me, the link will work in the end and jump to the correct page number]

Had I selected the text “Melbourne” instead of the text frame on the master page, I could have also assigned a different character style to be applied to the Hyperlink. Be aware though that applying a character style to a hyperlink text will remove any other local character style settings that might already be applied to the link text.
Appearance settings is another way in which you can make a hyperlink stand out. As the design of the interactive newsletter with its thumb tabs is pretty straight forward I opt not to apply a visual queue for the hyperlink.
For Appearance set Type to “Invisible Rectangle” and Highlight to “None” to create a fully functional hyperlink that only become apparent to the user when they move the cursor over the tab.
Click OK to complete the hyperlink.
We’re now ready to test this rollover effect in the interactive PDF.
Creating the PDF
Choose a File > Adobe PDF Presets and select a PDF setting from the list of settings. Alternatively choose File > Export and set Format to PDF.

In the General section of the Export Adobe PDF dialog ensure the Hyperlinks option is enabled for inclusion. Next click Export and generate the PDF.
Hi Cari,
I’m experiencing a remarkable problem:
I’ve made an interactive PDF in Indesign CS5 with several buttons. On the top of the document I placed two rows of buttons. The top row link to different pages of the document. This works fine.’
Behind these buttons I placed a second row of buttons with a green backgroundcolor. (Also placed in another layer to be sure that the linking button is shown in front)
On a page I’ve placed another button to show the greenbackground button below one of the topbar-button (To indicate that the process is finished).
This works fine in the indesign preview, but when i export my file to an interactive PDF the arrangements aren’t defined by the layers anymore. The color button i created later is now shown on top. Tried this in both Acrobat and Acrobat Pro, same problem in both programs.
Do you have any idea what can possible go wrong?
@Loek I’m thinking what you are encountering is normal behaviour. Interactive objects always overlay everything else, so if you were to place a button behind another object you’d likely see the interactive component pushed to the top. I’ve seen this in some early work I did when working in layers. Generally now-a-days I advice people to push all interactive components to the very top of their layers 🙂 and be the ‘top of the stack’ … Cari
Hi Cari,
Thanks for your response. I ended up attaching the file using Acrobat Pro after creating a pdf from Indesign.
When I tried creating a link in Indesign to opens the file as ane external file, I wasn’t able to ensure that this file was embedded into the document, and therefore ‘transported’ along with the file if I wanted to send it to someone. I should keep experimenting, and if anyone has any tips, I’d love to know this for the future.
Thanks for getting back to me and for your valuable advice.
Cheers
irene
Hi Irene,
As far as I’m aware you can’t embed a PDF into an InDesign document in such a way that you can open up the PDF and flick through the various pages of the PDF. However, you can attach a PDF as an attachment AFTER you’ve converted your InDesign document to PDF using Adobe Acrobat Pro. You can even attach the original Microsoft Word transcript if preferred.
Another thing you could try is in InDesign, adding a button or link that opens the PDF as an external file.
I hope this is of help.
Cari
Hi Cari,
Thank your for your informative tutorial and your availability in responding to our questions.
I would like to know if there is a way of embedding an external document (pdf or other) into an indesign document similar to how you can embed a video in a floating window. My intention is to link an interview transcript (it’s very long so I don’t want it taking up valuable real estate!) to my indesign document via a hyperlink anchor and then export the file to pdf so that I can click on the link to open up the interview document in a separate window.
I have created my indesign document with the CS4 version on a PC. The interview transcript is currently in MSword but I can easily save as pdf or copy it into indesign if that is necessary for this operation. I hope my question is clear?
Thank you in advance for your response.
Irene
@gduncombe
You can’t do this with hyperlinked text as far as I’m aware, but what I’d do — and you’d need InDesign CS6 for that — if the ‘print’ text is part of other text in a text frame, is:
Alternatively instead of a ‘transparent’ button, you can actually select some artwork in your InDesign file that has the appearance of a ‘print button’ and turn that into a button (following the same steps as above).
Hope this helps.
Cari
Hi I am trying to create a PDF from InDesign that has a link on to text saying PRINT. When you click it the print dialogue box will come up. Any idea how people are doing this?
Hi There,
I’ve just stumbled across your page searching for a solution to a fairly desperate and infuriating problem – I’m really hoping someone here may be able to help.
I’ve created a report for a client which includes several hyperlinks to URL’s. These work perfectly on my PC, also on my MacBook (in both Acrobat and Preview) but the client is not seeing them at all – and they’re trying them on several machines apparently (both Mac & PC). I’ve had another friend test the PDF on his MacBook and he sees the links, but they don’t work entirely as they should.
I’ve been through all the Adobe help pages and thought I’d found the solution by unchecking the ‘Shared Hyperlink Destination’ box – but that’s not made any difference. I’ve played with the settings on exporting the PDF; I’ve tried the >Export> Adobe PDF (interactive) way; I’ve tried defining my own pre-set with Incldue-Hyperlinks checked; I’ve tried deleting the hyperlinks from InDesign and manually inserting them from inside Acrobat Pro – all to no avail!
HELP!
This is a new client with a whole stack of work lined up for me and this has been the only problem with this job – so I need to find a solution!!
Thanks,
Luke
@Luke Probably one of the first things to check is what version of Adobe Reader your customer is using when opening the PDFs and have them try updating to the latest version or install any patches Adobe has released for the version they are working with. Also have them go through the preferences of Adobe Reader. Maybe IT has disabled hyperlinks from working. – That’s where I would start looking. It’s important to discover what is different on your customer’s computer/set-up from yours. — Cari
Hi Cari,
I can’t get the links to work in the exported PDF. It’s really frustrating me. I’ve selected my text, added the URL in the Hyperlinks panel, made sure “hyperlinks” were selected in export settings and yet, no click able link in the PDF. I have no idea what the problem is. Any suggestions?
Hi Antonia,
Are your hyperlinks InDesign hyperlinks (visible in the Hyperlinks panel) or just text such as http://www.carijansen.com?
If NOT, then check the preferences for Adobe Acrobat or the Free Adobe Reader:
* In the Catagories List, click General
* Select the ‘Create links from URLs’ checkbox
Hope this helps,
Cari
@Anisa,
What button action are you using?
I’ve just tested the scenario you describe in CS5, by creating a new Hyperlink Destination for Page 3 of a document, then placing a button on master page with roll-over and click Appearance set, and then an Action that is set to “Go to Destination” Page 3.
I use Export to Adobe PDF (Interactive) for the PDF output. And I can click the button, it shows the roll-over and click appearance changes AND jumps to Page 3 on Release.
Hey Cari!
Firstly, great job! Extremely clear and concise instructions and definitely a very helpful resource. *thumbs up like*
I am working on InDesign cs5 and am a Windows user. I have created buttons that change color when you roll over and after you click as well.
These buttons are on the main menu page and are hyperlinked to various pages. When I hit the preview button on Indesign, everything is working fine, the roll over color change as well as taking me to the desired page.
When I export it as a pdf though, the roll over works but it doesn’t take me to the desired page. It stays right there.
I checked the hyperlink and bookmark boxes in the Adobe pdf presets. However, I don’t have an export button at the end of the window, I have an ‘ok’ or ‘cancel’ option. I hit ‘ok’ and then ‘done’. As a pdf though it doesn’t work. (wish I could send you a screen shot)
Any suggestions?
Thanks,
Anisa
@Malachy thanks for adding that additional note for Christina Malachy 🙂
@Christina
Remember that some of the blending modes only work on RGB objects, not CMYK (I haven’t investigated why this is yet, something to do with additive vs subtractive colour schemes I suspect). So it may be that the outer glow effect is not blending properly when it is over an object that is CMYK instead of RGB. (and you may need to set the colour conversion to ‘none’ in the PDF export panel)
@Christina
Could it be that the blending-mode assigned to the outerglow disappears into a background tint/image on those pages? E.g. the rollover is working, you just don’t see the effect? What happens if you preview those pages in InDesign? is the effect there?
Cari
Hi Cari – great site! I came across it while researching this issue and wonder if you can help: I am creating an interactive swf in ID5 and on the master page created a navigation system on the top layer with buttons (next page, last, etc). Each button has a rollover state that has an outer glow effect – the problem is the glow doesn’t occur on some pages in the doc and there is nothing on a layer above so I am stumped. I havn’t overridden the master page, checked that the buttons are arranged to front…Any suggestions?
Hi Libby,
Thanks 🙂
To answer your question: no this isn’t all identical in CS3, it has separate States and Button panels if I remember correct. CS5 adds more once again. (I’ll have to make some time to write some update blogposts at some point 😉 )
Wow Cari! what a fantastic resource! thank you! do most of the interactive tutorials work for ID CS3?
I have created a button with lines of text that refer to stories further back in the pdf. How can I assign hyperlinks to text within a button? And is it possible to have multiple hyperlinks {Lines of text) within a single button?
@Walter
InDesign’s Hyperlink feature has support for this.
On the index page, highlight a name, then “New Hyperlink”, then change Link To: Page and choose page number…
If there is a range of names that all go to the same page and they are all listed one after another, you could highlight all of them and use the same feature.
Else, you could also considering adding a “hyperlink” layer probably and drawing invisible graphic frames over all the names that say need to go to page 2, then with them all selected, choose Object > Path > Make Compound Path … and then create a New Hyperlink for this compound path.
Hope this helps.
Cari
Hi,
I have an InDesign CS4 document that my client wants as PDF with an index of names that each links to the appropriate page. I can create a link for each name but there are hundreds of names but only 20 pages
Is there a way to create a hyperlink for each of the 20 pages and then just assign each name to the correct page? Or do I have to create a link for each name?
Thanks,
WZ
I am wanting to create a PDF from an Indesign document with a clickable TOC (like you can from Word). This tip wasn’t quite what I looking for. Could you help?
@Angie
I believe you’ll find the answer to that question in tip (6):
http://carijansen.com/2009/03/22/tip-085/
Cheers,
Cari
Does anyone know how to add a print function to a pdf? I’ve seen a pdf that has a little printer icon and when you click on it, it opens the print dialog box so you can print it. It also has a separate functionality for “save this”. Anyone know how they did it?
Hi there,
I’ve got a huge problem. I’ve created a document (52page) in indesign cs4. I need to export it as a PDF (which i’ve already done) only when i open it in acrobat 9 it displays as single pages. I have selected the option VIEW>PAGE DISPLAY>TWO UP CONTINUOUS, and the document is displayed correctly, however, it needs to be uploaded to a website as a pdf, for ‘viewers ‘ to download, with the download to show each double page spread in a single window ( next to each other without selecting the VIEW>PAGE DISPLAY etc). I have already tried adding a page in indesign, selecting the other pages, choosing ‘unable pages to shuffle’ to get all pages (importantly the front cover – initially) to show as a double page spread. Please, please, please can you help me?… I’m a graphic design company (newishly formed – and still work part time in a contact centre, to hopefully leave soon – helped by this job!!) and this job hinges on this very detail…
I really thank you in advance….
(any advice needed)
Mark Cadwallader.
@Mark.
It sounds like what you are after is exporting the pages as PDF spreads. You enable this option in the “General” section, under ‘Pages” in the Export Adobe PDF Dialog.
Hope this helps,
Cari