Fan of creative technology, elearning, instructional design and a little geeky

Chalk and tear-off edge mask

Digitip 030 – Adobe Photoshop CS

A quick tip on how to create digital tear-offs using Photoshop’s default chalk brush.

Preparation

In order to easily edit the tear-off edge after you’ve created it, I’d advice the use of a layer mask that can be edited by painting with black or white (or tints of black).

screenshot

To create a layer mask, launch the Layers palette and double click the Background thumbnail. The New Layer dialog box appears. You can alter the layer name (I’m being lazy and will leave the name as ‘Layer 0’.

screenshot screenshot

Now that the layer has been created a blank mask can be added, by clicking the Add a Mask button at the bottom of the palette.

Picking the brush

Select the brush tool and ensure that you’ve reset the foreground/background colours to black/white (press ‘D’ on keyboard).

screenshot

Next access the brushes palette (normally placed in the palette well) and from the Bursh Presets select a Chalk Brush. Chalk brushes are pretty good brushes to use as a tool for creating false tear-off edges on images.

screenshot

Hover the brush over the image to assess its brush size and use the [ and ] keys on the keyboard to enlarge the brush, until it’s a decent size (see below). Before you start painting away, check that you’re indeed painting the mask and not the image ( mask icon is displayed in the layers palette next to the show/hide layer ‘eye’ symbol).

screenshot

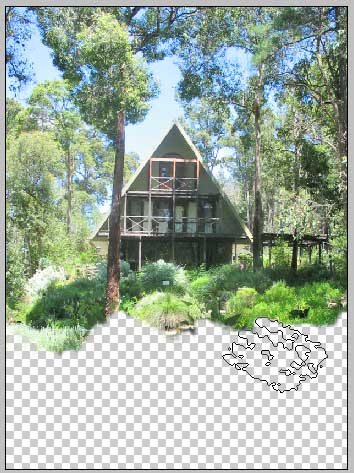
Paint away your edge…

screenshot

As you are painting with black you are generating transparency in Photoshop. When you’re happy, place the file in your InDesign document, and if needed from within InDesign Alt (Option) double click to open the file in Photoshop again for further editing. To add bits of edge back, paint with white, to remove bits of the edge paint with black.

screenshot

The added drop shadow (in InDesign), lifts the image of the page a bit.

Similar posts
  • Fixing up old photos with Adobe Photoshop As part of the April 2015 Adobe User Group meeting in Perth, I recorded a series of videos that covered some of the tips we reviewed during that meeting. For a full read-up about this meeting, please visit the Rejuvenating old photos and documents meeting round-up page. Video 1: Converting an old sepia tone back [...]
  • How to remove a background from an image in Photosho... How do I remove a background from an image? The following Photoshop tutorial (youtube video) shows one of many techniques there are for removing image backgrounds. The technique used doesn’t permanently remove the background pixels in the images, but allows you to further correct and fine-tune the transparent background you create through the use of [...]
  • Channels, Masks and Adjustment Layers… Channels, Masks, Adjustment Layers… Photoshop CS5 rocks when it comes to using these features in conjunction with each other. Did you know you could use color channel information in Photoshop as the basis for a mask, that will control where a particular color adjustment might be applied? All without harming any pixels whatsoever in the original image? [...]
  • Removing power lines from a photo with Photoshop Photoshop CS5 introduces us to a very cool new tool, the Content-Aware Spot Healing Brush Tool a true power  tool, that has many different uses. You can use it to get rid of blemishes in an image, such as spot in a persons face, clean-up rubbish or loose leaves that might lay on a lawn in [...]
  • How to fix horizons that are on an angle in Photosho... We've all got them... those holiday shots where the ocean seems to be running of the edge of the image, where the horizon is no longer horizontal. With Photoshop CS5 we can straighten out those images faster then ever before. In the following video let's take a look at how we can use the Crop tool, Ruler tool, Arbitrary rotation, [...]

No Comments Yet

Leave a Reply

Your email address will not be published. Required fields are marked *