Fan of creative technology, elearning, instructional design and a little geeky

Greyscale pic on colour background

Digitip 014 – Adobe InDesign 2

Rather than having to use the duotone image mode in Photoshop (using a flat tint “curve” for the tint colour), there is a simple trick in InDesign, that allows you to overprint greyscale images onto flat-tinted backgrounds. You can use one of two methods. The first method is a more conventional one, and requires creation of two frames, the second method works with a single frame and is a bit more tricky.

Method 1 – Two separate frames

Start by creating a frame with a flat tinted coloured background. Then place the greyscale image (Adobe Photoshop .psd file) as a separate object above the first frame.

frame to multiply

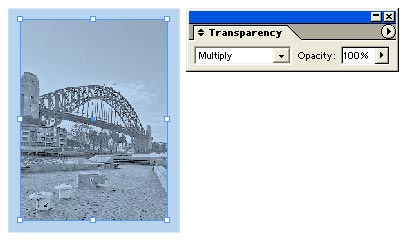
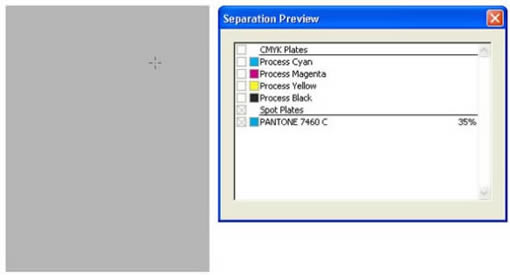
Select the top frame and set the blending mode to “Multiply”. The image will now “overprint” over the coloured background. The colour separations will appear as follows:

separation view black

separation view spot colour

Method 2 – Using a “fake” gradient in single frame

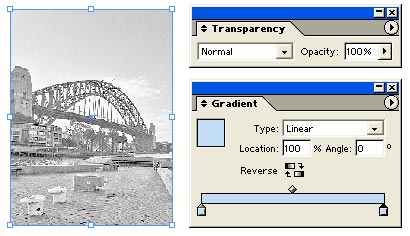
This method is a bit more tricky, but seems to work well and uses a single frame. Start by placing the image, then select the frame.

image placed and selected

Next, apply a gradient to the frame. Run the gradient from colour “A” to colour “A” (simulating a flat tint).

fake gradient applied

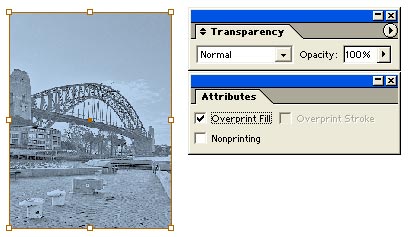
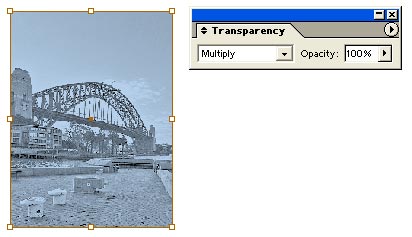
Next, select the image (direct selection tool), and do one of two things.

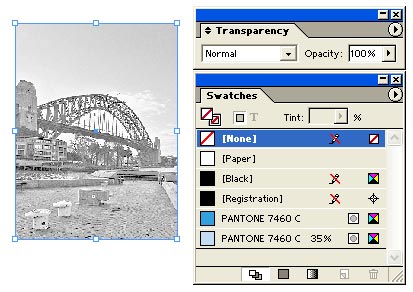
a) in the attributes palette set the fill colour to “Overprint Fill”

overprint fill

b) in the transparency palette set the blending mode to “Multiply”.

multiply

Assure that “overprint preview” is enabled in InDesign for a WISYWIG preview.

separation view spot colour

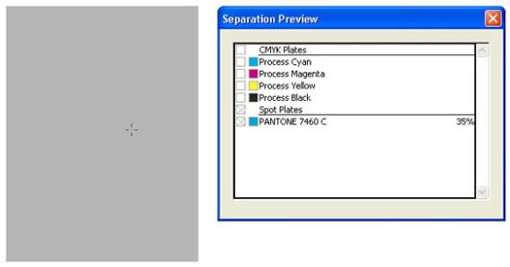
The separation view will correctly overprint the greyscale image in both option a) and b). Please note that this second method only seems to work with gradients, and not on real flat-tints.

If you’ve discovered an additional technique, send me an e-mail and I’ll add it to this tips page.

Thanks to Scott for posting this question on prepressforums.com and giving me the idea to add this tip.

Similar posts
  • Adobe InDesign and XML: A Reference Guide The following is a reference guide I have compiled over time for those of you who are looking at doing a little more with XML in InDesign (originally published Feb. 2011, last updated Feb 2018). If you have any extra information you’d like to see added to this guide, feel free to message me. Mapping XML tags to InDesign [...]
  • How to change the colour of bullet points in InDesig... A few weeks ago I recorded a short quick tip tutorial. InDesign’s Control panel, gives users a quick and easy way to format text as a bulleted list. Highlight the text, and click the Bulleted List button in the Paragraph Formatting Controls mode for the Control panel. This applies a universal bullet character as the [...]
  • Creating a pop-up window in a PDF with Adobe InDesig... In the following YouTube tutorial, we’ll create an interactive PDF from Adobe InDesign, in which we click on a button, which in turn opens up a simple pop-up window containing a close-box. When the close-box is clicked the pop-up window disappears [...]
  • InDesign: Facing pages with odd-numbered left pages Back in 2004 I wrote a tip for InDesign CS on how you could have the first page of your document be a left page AND have it start with page number 1. It’s hard to believe this is almost a decade ago… But a recent question on Facebook, made me think I should really [...]
  • Negative Lookbehind – GREP for Designers This is the fourth and final blog-posts in a series of posts on lookaheads and lookbehinds in GREP, written after speaking at the Perth InDesign User Group. My speaker notes are also available: What is GREP? (PDF download) (2.4Mb). In the previous three posts I briefly introduced GREP, and we took a look at Positive [...]

No Comments Yet

Leave a Reply

Your email address will not be published. Required fields are marked *