Digitip 006 – InDesign 2
Do you find that the automatic “Detect Edges” or “Transparency Channel” text wrap option in InDesign creates too many points for the wrap path? The semi-automatic method is a bit of a work-around which creates smoother text wrap paths around transparent images. First let’s look at the automatic methods.
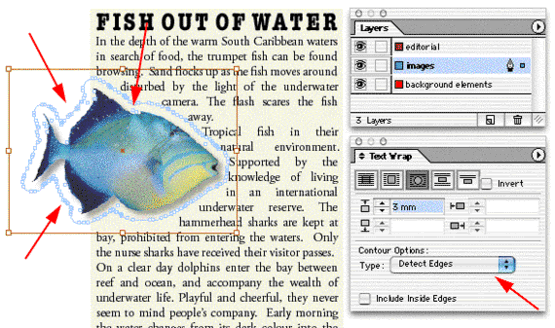
The automatic way – detect edges
To use the “Detect Edges” Contour Options for a text wrap around a pixel based image, start out by saving the image (from Photoshop) in native Photoshop (.psd), tiff (.tif) or Photoshop PDF (.pdf or .pdp) format. Select the image and from the “Contour Options” in the Text Wrap palette select Type : “Detect Edges”. InDesign automatically detects edges of image.
For those with a keen eye: the text wrap path around the .psd and .tif files will be identical. The wrap around the .pdf will be slightly different.
It seems difficult to automatically generate a path that has a limited amount of anchor points or lacks stray points.
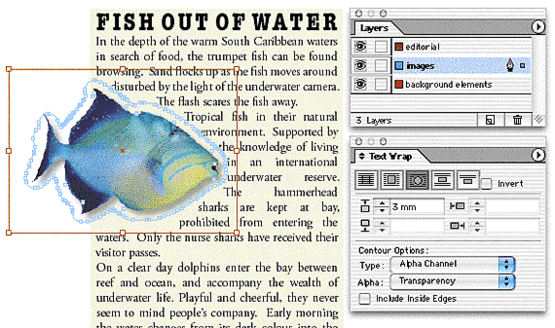
The automatic way – transparency channel
For the Photoshop image (.psd) and the tiff (.tif), there is a second automatic method that can be used to create a text wrap path. Under “Contour Options” set the “Type” to “Alpha Channel”, then select the Alpha: Transparency option.
Generating an alpha channel in Photoshop and naming and saving it, also creates a usuable channel that can generate a text wrap path.
This method, similar to the “Detect Edges” method, creates a rough path (slightly different from the path generated by “Detect Edges”. Naturally you can use the “smooth tool” and other path editing tools to “smoothen” the path to your liking however, the semi-automatic method might be more useful.
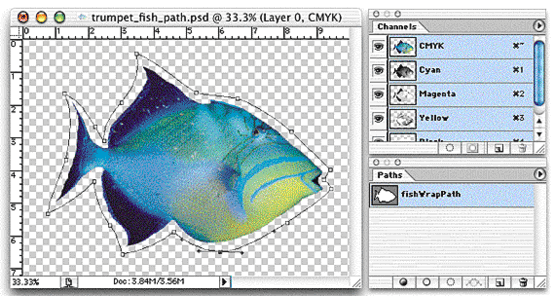
The semi-automatic method: using an embedded Photoshop Path
In Photoshop start out by creating a path outside the image area. Save and name the path (Paths palette). Then save the image as either a native Photoshop file (or a tiff, if needed).
Back in InDesign, you place the image and select “Photoshop Path” from the “Contour Options” Type menu. From the Path menu select the path name of the path you’ve just created.
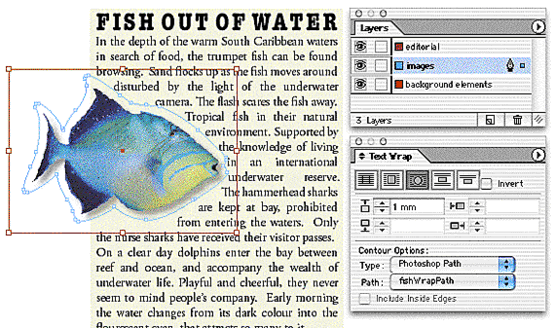
The great thing about this method is that you can still increase or decrease the “(Top) Offset” setting, more anchor points are automatically generated if needed. The overal wrap path however, is much smoother.
The wish-list:
(1) To have fidelity and smoothness option for automatic text wrap feature?
(2) A (Photoshop) PDF that can capture Photoshop Paths and Alpha Channels?
Leave a Reply