Digitip 079 – Adobe InDesign, Photo Album and sticky tape
Another image magic trick we showed at the recent Perth InDesign User Group meeting is how to create a sticky tape / photo collage effect using Object Styles.

Where do we start? Let’s design our look first.
I’ve placed an image and set the Frame Fitting Options for the frame to Fill Frame Proportionately from the Centre (see also Frame Fitting Options in previous post). That is so that we can apply our future Object Style to empty frames, resulting in images automatically being sized when we drop them in…
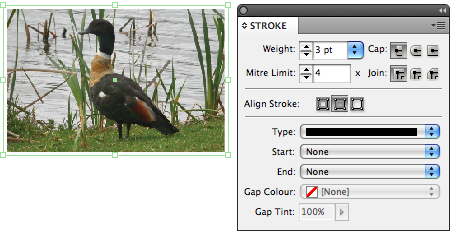
The border I’ve set to a 3 point solid Paper stroke.
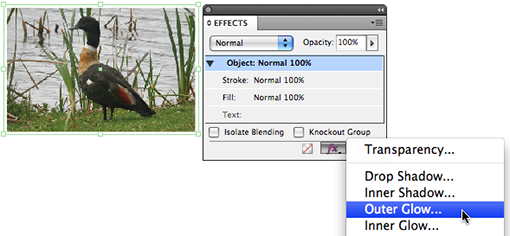
In order to add some depth to the image on the page, let’s add a fuzzy darkish outline around the image. Select the image with the Selection Tool and check that the Effects panel is visible. At the bottom of the Effects panel, choose the Object Effects drop down and select Outer Glow…
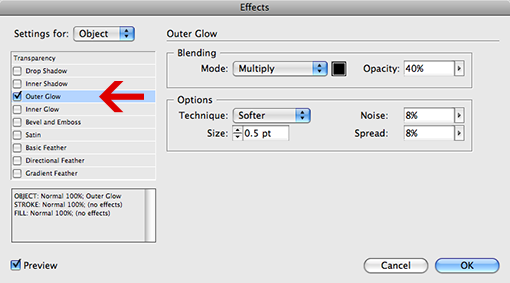
The Effects dialog appears. I’m changing the Blending Mode to Multiply, as this behaves like an overprint where images overlap and set the colour to Black and Opacity to 40% so that part of the underlaying images will display (in fact 60%!). For the Options I’ve gone for a very subtle Size of 0.5pt and a little Noise (scattering of the effect on the outer edges of the ‘fuzziness’ and spread of 8% (this means that the fuzzying of the glow doesn’t start immediately, but displays solid 40% opacity for the first 8% before fading into full transparency (0% opacity).
With the basic design done, we can now create an Object Style. Select the artwork, then from the Object Styles panel menu choose New Object Style…

The New Object Style dialog appears. Name the style (Picture wBorder). The dialog picks up all settings that were applied to the image, more than those few we just added. Let’s uncheck all of the ones we never touched, so that these aren’t overwriting any settings that might already have been applied to the object. Just leaving the Stroke, Frame Fitting Options and Outer Glow settings enabled.

Click OK to create the new Object Style. You’re can now select all of the images in your collage and click the Object Style name in the panel to apply the Stroke, Outer Glow settings etc. without the need to manually set all of these for each image on the page.
Sticky Tape effect
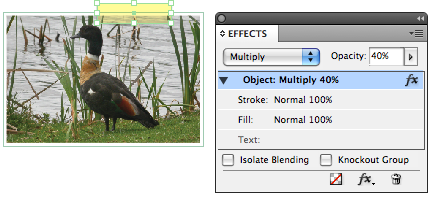
We’re ready to start working on the Sticky Tape effect now, I’ve placed a small rectangle over the top of the image so I can see the effect as I’m building it. Fill the shape with 100% Yellow, then using the Effects panel, set the Opacity on the selected object to 40% and set the blending mode to Multiply. That will ensure the sticky tape really gives that true transparent look.
After this I replicate the tiny Outer Glow I applied to the Image border earlier on. Using the exact same settings and also apply a tiny drop shadow.

Once again, with the basic design done, an Object Style can be created. Select the artwork, then from the Object Styles panel menu choose New Object Style…
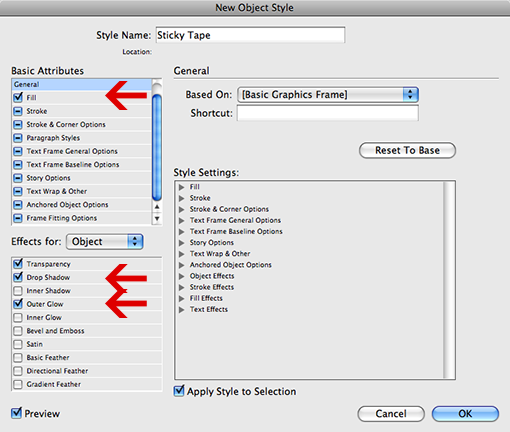
The New Object Style dialog appears. Name the style (Sticky Tape). The dialog picks up all settings that were applied to the image, more than those few we just added. Let’s uncheck all of the ones we never touched, so that these aren’t overwriting any settings that might already have been applied to the object. Just leaving the Fill, Drop Shadow and Outer Glow settings enabled.
Apply this object style to the many pieces of sticky tape you’ve drawn over your images.

Editing the object style
So let’s assume we want to make some global changes to our design, you decided you’d like to use another type of sticky tape or use black instead of white borders. We’re in luck, as we’ve used an Object Style as way of formatting the image borders, shades and sticky tape etc.
To make the change globally, start by selecting one of the pieces of sticky tape (in my example), and change the colour, opacity etc. If you look at the Object Style name in the Object Styles panel there will now be a small “+” symbol next to the style name. When hovering over this and pausing the cursor on the style name you’ll see a tip that tells you exactly what changes you’ve made that are different to the Object Style.

To incorporate the changes you’ve made in the Object Style, select Redefine Style from the Object Styles panel menu. And in one quick click all of the artwork that has a link to that style has been updated.
Happy Scrapbooking 🙂
Leave a Reply